Hi, my name is Jessica, and I am a crafter. There, it’s out. Judge me accordingly.
I don’t know if there is a direct connection between Pinterest or my newest discovery, Craftgawker, and my rejuvenated crafting habit. I think it’s more likely that I’ve been crafting due to the sudden lack of school deadlines. Whatever it is, I have taken to crafting like my husband takes to glass Coke bottles at Christmas—I just can’t get enough.
The thing is, I'm actually not very good at crafting. I don’t have original ideas, and I am not a visual perfectionist. If I was an artist, I’d be a throw paint at a tarp and walk away kind of artist.
Nevertheless, I thought I’d do what the serious bloggers do and make a tutorial of the craft I made today. Here is the result.
Materials:
Lamp shade
Mod Podge
Paint Brush (mine was too wide to fit in the bottle of Mod Podge)
Old calendar page (in this case a calendar of old world maps)
Butcher paper
Wooden Spoon
Cutting board
Utility knife (Probably should have used an exacto knife, but the utility knife was closer)
Lint Brush
Paper
Tape
Grafting Paper
Pencil
Step 1: Remove fake flowers from previous crafting atttempt on lamp shade. Don't bother picking off the hot glue. It will be covered by paper anyway.
Step 2: Use lint brush to remove years of cat hair from shade. What does she do, sleep curled around the thing?
Step 3: Lay shade on calendar paper and stare at it for a while. Accept that you don't understand enough math to put a square piece of paper evenly on a rounded lamp shade.
Step 4: Roll shade over calendar page while trying to trace pattern with pencil.
Step 5: Notice that you can’t see the pencil marking on the calendar page.
Step 6: Tape two pieces of printer paper together to make template.
Step 7: Repeat step 4 on blank paper.
Step 8: Now HERE is one of my more brilliant ideas. Place a stolen piece of graphite paper between new template and and calendar page. Trace curvy lines onto calendar.
Step 9: Flip graphite paper the proper way so it leaves markings on the calendar paper and NOT the template paper.
Step 10: Feel very proud of yourself and cut out curved shape from calendar paper.
Step 11: Roll eyes when you realize the calendar paper is much too small to cover entire lamp shade.
Step 12: Repeat steps 9 and 10 on spare piece of butcher paper found lying around (don’t worry, readers. It is previously unused).
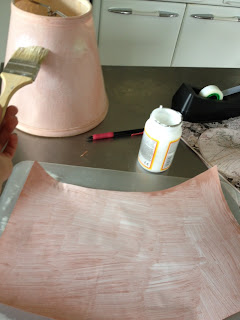
Step 13: Dip paintbrush that is far too wide as deep as you can into the bottle of Mod Podge and manage to cover the tips of the bristles in glue. Paint a thin layer of glue on the backs of calendar page and butcher paper, and surface of the lamp shade.
Step 14: Line butcher paper onto shade first and press down. Ignore the fact that the shape isn’t perfect and doesn't quite reach the edge of the lamp shade in some places.
Step 15: Attempt to use wooden spoon to smooth out wrinkles. Forget that, too much effort.
Step 16: Apply a thin-ish layer of Mod Podge over surface of butcher paper, trying to stick down edges as best you can.
Step 17: Repeat with calendar paper over space not covered by butcher paper.
Step 18: Cut little corners of butcher paper to cover places your math skills are just too lacking to account for.
Step 19: Realize the level of Mod Podge has dipped too low in bottle for paintbrush to reach and dump a puddle of Mod Podge onto cutting board instead.
Step 20: Paint three new layers of Mod Podge over entire shade, allowing 15 minutes to dry between coats.
Step 21: Put new fancy shade back on lamp and feel very proud of yourself.
Step 22: Turn on lamp and discover you can see the dates from the back of the calendar page.
Step 23: Find it all quite hilarious and love your little Mod Podged lamp shade anyway.
Next time: Hand-knit sweaters for everyone!


No comments:
Post a Comment